Travel

Categories

Israel-Jordon以色列-約旦

[hgallery3 id=”10124″ height=”231″ width=”320]

Load balancing & NAT-ing multiple uplinks on Linux

LAN: eth0: 192.168.0.1/24

IP1: eth1: 192.168.1.1/24, gateway: 192.168.1.2/24

IP2: eth2: 192.168.2.1/24, gateway: 192.168.2.2/24

So here is how I would do by using iptables method:

Route tables

First edit the /etc/iproute2/rt_tables to add a map between route table numbers and ISP names

... 
10 IP1 
20 IP2 
... 

So table 10 and 20 is for ISP1 and ISP2, respectively. I need to populate these tables with routes from main table with this code snippet (which I have taken from hxxp://linux-ip.net/html/adv-multi-internet.html)

#!/bin/bash ip route show table main | grep -Ev '^default' | while read ROUTE ; do 
ip route add table IP1 $ROUTE 
done 

And add default gateway to ISP1 through that ISP1’s gateway:

ip route add default via 192.168.1.2 table IP1 

Do the same for IP2

So now I have 2 route tables, 1 for each IP.

Iptables

OK now I use iptables to evenly distribute packets to each route tables. More info on how this work can be found here (http://www.diegolima.org/wordpress/?p=36) and here (http://home.regit.org/?page%5Fid=7)

# iptables -t mangle -A PREROUTING -j CONNMARK --restore-mark 
# iptables -t mangle -A PREROUTING -m mark ! --mark 0 -j ACCEPT 
# iptables -t mangle -A PREROUTING -j MARK --set-mark 10 
# iptables -t mangle -A PREROUTING -m statistic --mode random --probability 0.5 -j MARK --set-mark 20 
# iptables -t mangle -A PREROUTING -j CONNMARK --save-mark 

NAT

Well NAT is easy:

# iptables -t nat -A POSTROUTING -o eth1 -j MASQUERADE 
# iptables -t nat -A POSTROUTING -o eth2 -j MASQUERADE

Sky100

[hgallery3 id=”9122″ height=”231″ width=”320]

Measure IOPs in Unix/Linux

http://www.refmanual.com/2012/11/16/measure-unix-iops/

IOPS = (MBps Throughput / KB per IO) * 1024
Or
MBps = (IOPS * KB per IO) / 1024

CentOS/RHEL 6 virtualized guest tuning

1.yum install tuned tuned-utils

2. tuned-adm profile virtual-guest

3. dd if=/dev/zero of=tmpfile bs=1M count=1000

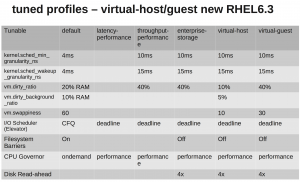
See the tables below :

Profile explanation :

default
The default power-saving profile. This is the most basic power-saving profile. It enables only the disk and CPU plug-ins. Note that this is not the same as turning tuned-adm off, where both tuned and ktune are disabled.

latency-performance
A server profile for typical latency performance tuning. It disables tuned and ktune power-saving mechanisms. The cpuspeed mode changes to performance. The I/O elevator is changed to deadline for each device. For power management quality of service, cpu_dma_latency requirement value 0 is registered.

throughput-performance
A server profile for typical throughput performance tuning. This profile is recommended if the system does not have enterprise-class storage. It is the same as latency-performance, except:
kernel.sched_min_granularity_ns (scheduler minimal preemption granularity) is set to 10 milliseconds,
kernel.sched_wakeup_granularity_ns (scheduler wake-up granularity) is set to 15 milliseconds,
vm.dirty_ratio (virtual machine dirty ratio) is set to 40%, and
transparent huge pages are enabled.

enterprise-storage
This profile is recommended for enterprise-sized server configurations with enterprise-class storage, including battery-backed controller cache protection and management of on-disk cache. It is the same as the throughput-performance profile, with one addition: file systems are re-mounted with barrier=0.

virtual-guest
This profile is recommended for enterprise-sized server configurations with enterprise-class storage, including battery-backed controller cache protection and management of on-disk cache. It is the same as the throughput-performance profile, except:
readahead value is set to 4x, and
non root/boot file systems are re-mounted with barrier=0.

virtual-host
Based on the enterprise-storage profile, virtual-host also decreases the swappiness of virtual memory and enables more aggressive writeback of dirty pages. This profile is available in Red Hat Enterprise Linux 6.3 and later, and is the recommended profile for virtualization hosts, including both KVM and Red Hat Enterprise Virtualization hosts.

https://access.redhat.com/site/documentation/en-US/Red_Hat_Enterprise_Linux/6/html-single/Performance_Tuning_Guide/index.html

荃灣海濱

[hgallery3 id=”9058″ height=”231″ width=”320]

UEFI and Ubuntu

https://help.ubuntu.com/community/UEFI

http://askubuntu.com/questions/221835/installing-ubuntu-on-a-pre-installed-uefi-supported-windows-8-system

Sendmail smtp auth under CentOS 6

1.Get signed server certificate for auth

2. edit sendmail.mc as below : (port 587 is listened by default, no need to add in the mc)

define(`confAUTH_OPTIONS', `A p y')dnl
 TRUST_AUTH_MECH(`LOGIN PLAIN')dnl
 define(`confAUTH_MECHANISMS', `LOGIN PLAIN')dnl
 define(`confCACERT_PATH',`/etc/pki/tls/certs')
 define(`confCACERT',`/etc/pki/tls/certs/gd_bundle.crt')
 define(`confSERVER_CERT',`/etc/pki/tls/certs/server.crt')
 define(`confSERVER_KEY',`/etc/pki/tls/certs/server.key')
 DAEMON_OPTIONS(`Port=465,Addr=0.0.0.0, Name=MTA')

3. install saslauthd, make sure the below are installed :

cyrus-sasl-plain
cyrus-sasl-devel
cyrus-sasl-lib
cyrus-sasl

4. Check /etc/sysconfig/saslauthd,  should be as below :

MECH=pam
# these two settings are the defaults
SOCKETDIR=/var/run/saslauthd
FLAGS=

5. check /etc/sasl2/Sendmail.conf, should be as below :

pwcheck_method:saslauthd

6. service saslauthd restart; service sendmail restart

7. Use the command : openssl s_client -starttls smtp -connect localhost:587 and then enter
EHLO localhost for debugging, you should see something as below :

EHLO localhost
250-testhost.ie.cuhk.edu.hk Hello localhost [127.0.0.1], pleased to meet you
250-ENHANCEDSTATUSCODES
250-PIPELINING
250-EXPN
250-VERB
250-8BITMIME
250-SIZE 200000000
250-DSN
250-ETRN
250-AUTH LOGIN PLAIN
250-DELIVERBY
250 HELP


Use NOOP I/O Scheduler for virtualized Linux guest with kernel 2.6 guest on vmware

Refer to http://kb.vmware.com/selfservice/microsites/search.do?language=en_US&cmd=displayKC&externalId=2011861

  • The scheduler can be set for each hard disk unit. To check which scheduler is being used for particular drive, run this command:

    cat /sys/block/disk/queue/scheduler

    For example, to check the current I/O scheduler for sda:

    # cat /sys/block/sda/queue/scheduler
    [noop] anticipatory deadline cfq

    In this example, the sda drive scheduler is set to NOOP.

  • To change the scheduler on a running system, run this command:

    # echo scheduler > /sys/block/disk/queue/scheduler

    For example, to set the sda I/O scheduler to NOOP:

    # echo noop > /sys/block/sda/queue/scheduler

    Note: This command will not change the scheduler permanently. The scheduler will be reset to the default on reboot. To make the system use a specific scheduler by default, add an elevator parameter to the default kernel entry in the GRUB boot loader menu.lst file.

    For example, to make NOOP the default scheduler for the system, the /boot/grub/menu.lst kernel entry would look like this:

    title CentOS (2.6.18-128.4.1.el5)
    root (hd0,0)
    kernel /vmlinuz-2.6.18-128.4.1.el5 ro root=/dev/VolGroup00/LogVol00 elevator=noop
    initrd /initrd-2.6.18-128.4.1.el5.img

    With the elevator parameter in place, the system will set the I/O scheduler to the one specified on every boot.

Linux 2.6+ tuning for Data Transfer hosts connected at speeds of 1Gbps or higher

http://fasterdata.es.net/host-tuning/linux/