Travel

Categories

Image resolution of different lens I owned

(All results from http://www.lenstip.com)

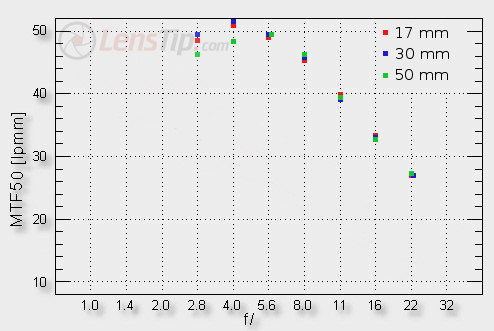
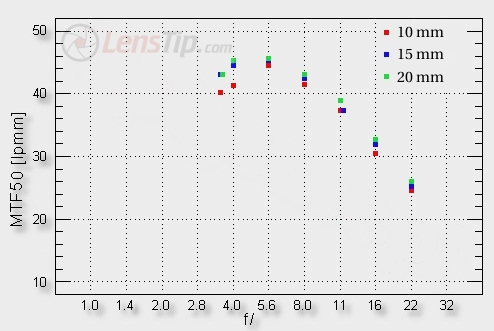
Sigma 17-50 mm f/2.8 EX DC OS HSM

Measured using a Canon 50D body (best prime: 52lpmm, decency level : 34-35lpmm)

At the maximum relative aperture we see excellent – maybe even outstanding, when we take into account the fact that we deal here with a zoom lens- results at the level of 49 lpmm. By f/4.0 and upwards it would be difficult to differentiate between the Sigma and a good prime lens. A bit weaker performance we saw at 50 mm. The differences are not big; even there the lens fares very well indeed because at the maximum relative aperture it reaches the result above 46 lpmm and by f/5.6 it goes as far as 50 lpmm


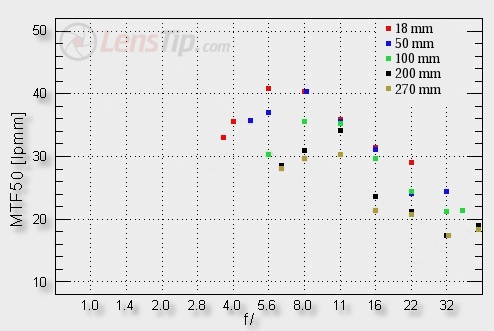
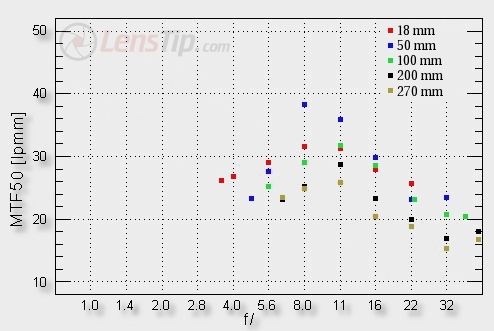
Tamron AF 18-270 mm f/3.5-6.3 Di II VC LD Asph. (IF) MACRO

Measured using a Nikon D200 body (best prime: 45.6lpmm, decency level : 30lpmm)

The 270 mm focal length should be treated as the last resort because there, even on solid stopping down, we just brush against the decency level, set at 30 lpmm. What’s interesting, the 200 mm focal length seems to be useful and near f/11 it generates good quality images.

At the shortest focal length the lens fares very decently, although at the maximum relative aperture it definitely lags behind the Nikkor. The focal lengths of 50, 100 and 200 mm for a change are momentarily better than those of the Nikkor’s. The overall assessment of the Tamron at the edge of the frame might be even better than the Nikkor’s then! Like it was the case in the frame centre, also here the 270 mm focal length must be treated only as the last resort. Still the results the Tamron achieves at 270 mm are better than those the Nikkor shows at 200 mm.

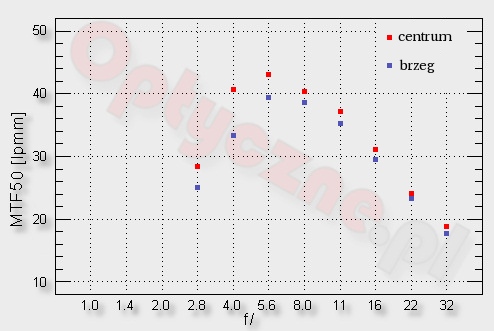
Tamron SP AF 90 mm f/2.8 Di Macro

Measured using a Canon 20D body (best prime: 44.9pmm, decency level : 30lpmm)

For the stops f/4, f/5.6 and f/8 exceeded the level of 40 lpmm

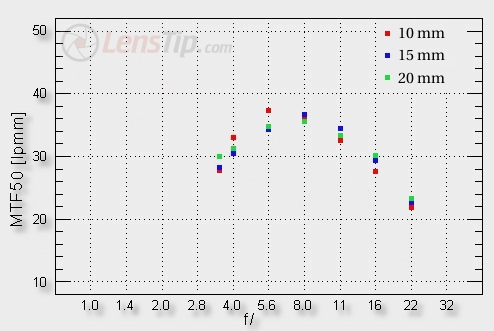
Sigma 10-20 mm f/3.5 EX DC HSM

Measured using Nikon D200 body (best prime: 45.6lpmm, decency level : 30lpmm)

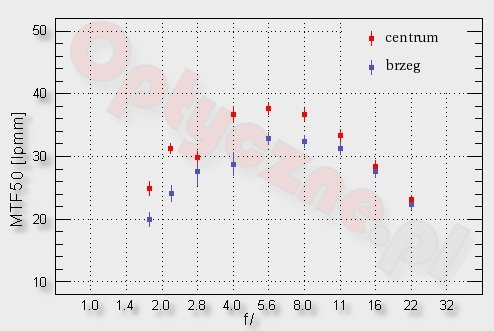
Canon EF 50 mm f/1.8 II

Measured using a Canon 20D body (best prime: 44.9pmm, decency level : 30lpmm)

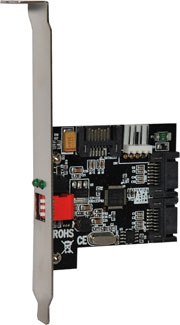
VMware ESXi with Magic Pro MP-1920 SATA port multiper

After the testing and deployment of a StarDom external hardware RAID1 box with VMware ESXi to store the vm images (http://staff.ie.cuhk.edu.hk/~sfluk/wordpress/?p=2154), I found another even better solution : A Magic Pro MP-1920 SATA port multiplier card (HK $230). It is an internal hardware RAID card which do not require any driver to be installed in the OS. The RAID is configured by a dip switch and recognized as a single SATA drive by the BIOS. I found it perfectly fit into my plan to turn Dell Optiplex desktop into a cheap  VMware ESXi pool but still have the RAID1 redundancy to protect the vm images stored in the box.

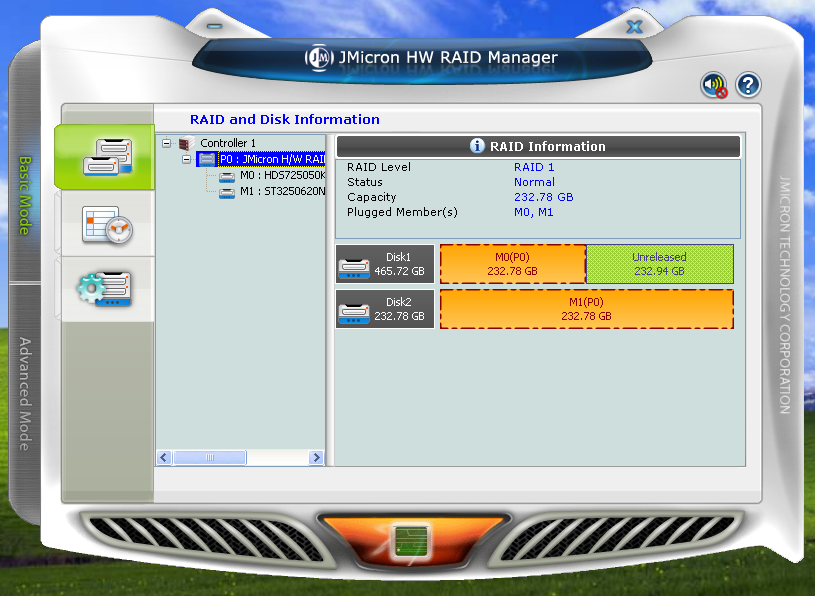
One strange thing is that under a Windows XP running inside the virtual machine created by esxi environment, I can still install the RAID manager of the controller and able to monitor the status and general email alert, etc. I don’t know how can the RAID manager communicate with the RAID controller inside a virtual machine of ESXi.

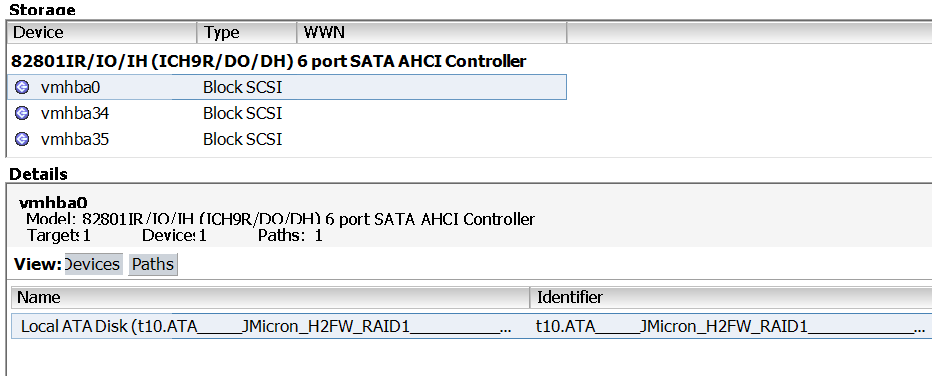
↑The RAID1 volume created by the controller is recognized as a single SATA drive connected to the motherboard by esxi

↑RAID manager running inside Windows XP vm on ESXi

↑SMART status can be read through the manager

↑Showing rebuild status and progress

↑Email notification can be configured to report the RAID status

Clear jumplist in Windows 7

del %appdata%\microsoft\windows\recent\automaticdestinations\*

Lens profile support for Photoshop CS5

http://kb2.adobe.com/cps/846/cpsid_84666.html

Two free backup program for Windows

EASEUS Todo Backup

Comodo backup

Comodo Time Machine

Topaz adjust and HDR

1. duplicate of the original background layer. Rename this new layer multiply. Set the transparency setting to multiply and the opacity to 40%.

2. Keep your multiply layer selected and apply the Topaz Adjust filter to that layer using the preset Mild Color Pop

3. Duplicate the original background layer again and name this layer overlay. Change the transparency to overlay and the opacity to 20%.

4. Keep your overlay layer selected and apply the Topaz Adjust filter to that layer using the preset Neutralizer by JorgeDiaz

5. Duplicate the background layer once again and merge that layer with the multiply layer and the overlay layer.

http://captainkimo.com/enhancing-hdr-images-topaz-adjust

2011 Lego Exhibition

[hgallery3 id=”6509″ height=”231″ width=”320″]

2011 Central + Victoria Habour

[hgallery3 id=”6502″ height=”231″ width=”320″]

2011 景賢里

[hgallery3 id=”6461″ height=”231″ width=”320″]

無題