This is just served as a working notes for me.
1. Download VMware ESXi 4.0 Installable Edition from here:
2. Put the ESXi 4 Installable Edition in a USB thumbdrive, instructions can be gotten from http://staff.ie.cuhk.edu.hk/~sfluk/wordpress/?p=830 . Or after you get the dd image, you can just use the linux dd to put it into your thumbdrive.
3. Boot the ESXi 4 using the USB thumbdrive in the PE machine.
4. Download the Dell OpenManage Offline Bundle and VIB for ESXi 4.0 from here. (get the VIB for ESXi 4.0 update 1 and ESXi 4.1 here)
5. Download and install vSphere CLI from http://www.vmware.com/support/developer/vcli/
6. Navigate to the folder where you have installed the vSphere CLI utilities to execute the command : vihostupdate.pl –server <IP address of ESXi 4 host> -i -b <path to Dell OpenManage Bundle>. You will need to wait 5 to 10 minutes for the command to complete. There’s no progress echo returned during the time.
7. Enable the CIM OEM providers as below :
- Log on to the VMware ESXi 4 system in which vSphere Client is installed.
- Click the Configuration tab.
- Under the Software section on the left side, click Advanced Settings.
- In the Advanced Settings dialog box, click “UserVars” on the left pane.
- Change the value of the “CIMOEMProvidersEnabled” field to 1.
- Click OK.
- Restart your system for the change to take effect. Use the Summary tab in vSphere Client to restart the system.
8. To check the sucessfull installation of the VIB. Login the ESXi console, Press Alt-F1 and type unsupported to login the command prompt, run “/usr/lib/ext/dell/dataeng status” to verify the Dell OpenManage service is running or not. (edit /etc/inetd.conf to enable ssh for remote console login). You can also run esxupdate --vib-view query | grep dell to check if the installation.
[If you are using Vista/win7, UAC filtering for local accounts must be disabled by creating the following DWORD registry entry and setting its value to 1: [HKLM\SOFTWARE\Microsoft\Windows\CurrentVersion\Policies\System] LocalAccountTokenFilterPolicy] otherwise, you will get ” Access is denied” when running “winrm create”]see http://msdn.microsoft.com/en-us/library/aa384423.aspx
Again, Later I found the win7(I upgraded my Vista!!) can’t install the OSA as it said that it need winrm 1.1 and win7 is running winrm 2.0, finally I install winrm1.1 ( WindowsXP-KB936059-x86-ENU) on another XP and finish the rest
9. Install OMSA 6.1 on my Vista machine, instructions getting from here. Brief steps as below :
- Download IIS Resource Kit from http://www.microsoft.com/downloads/details.aspx?FamilyId=56FC92EE-A71A-4C73-B628-ADE629C89499&displaylang=en
- Click Start -> Programs -> IIS Resource -> SelfSSL -> SelfSSL.
- Type selfssl /T /N:CN=<computer_name or domain_name>. (Make sure run this program in administrator console) [If you get error the following error “Failed to acquire the cryptographic context, try this :
- Click Start, click Run, type “\Documents and Settings\All Users\Application Data\Microsoft\Crypto\RSA\”, and then click OK.
- Right-click MachineKeys, and then click Properties.
- On the Security tab, click Administrator or click the administrator group account you want, click to select the check box to enable Full Control permissions, and then click OK.
- Get the sign-signed certificate thumbprint by running MMC
- Click File -> Add/Remove Snap-in. in MMC and Click Add.
- Choose Certificates and click Add.
- Select Computer account option and click Next.
- Select Local Computer and click Finish.
- In the Console screen, expand Certificates (Local Computer) in the left navigation pane
- Expand Personal.
- Select Certificates.
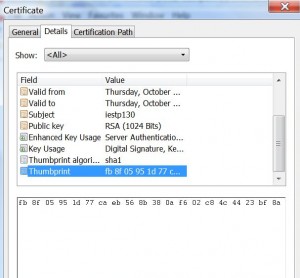
- In the right-hand pane, double-click the required certificate. The Certificate screen displays.Click Details tab.Select Thumbprint.
- To enable the HTTPS listener on WinRM, type the following command: winrm create winrm/config/Listener?Address=*+Transport=HTTPS @{Hostname=”<host_name>”;CertificateThumbprint=”6e132c546767bf16a8acf4fe0e713d5b2da43013″}
- Pls note that there is a space between HTTPS and @. Moreover, pls DO NOT COPY THE ABOVE COMMAND. RETYPE IT TO PREVENT UNSEEN CHARACTORS COPIED.
- Configure your firewall to allow incoming traffic for WinRM
- Install the OMSA installer from PowerEdge provided CD or download from here (Make sure in Administrator console)
- Make sure the DSM SA service have been started
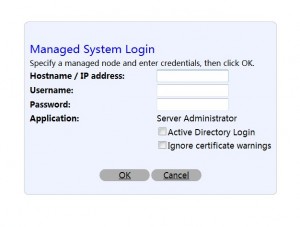
- Go to https://<yourhost>:1311/ and connect to your esxi
More reference : ESXi_VMWare_OM, dell_esxi_om
Updated procedures for Open Manage 7.1/Esxi 5.0 and Windows 7 as OMSA web server
1. To enable winrm on Windows 7 :
– Add a password to your administrator accunt if it does not have one.
– Run cmd as an administrator and issue “reg add HKLM\SOFTWARE\Microsoft\Windows\CurrentVersion\Policies\System /v LocalAccountTokenFilterPolicy /t REG_DWORD /d 1 /f”
– Reboot
– “winrm quickconfig”
– “winrm configsddl default”
– Get a pkcs12 certificate for your windows 7
– import it using mmc console (run mmc, add certificate snap-in), make sure you move your own CA certificates to appropate store winrm create winrm/config/Listener?Address=*+Transport=HTTPS @{Hostname=”<host_name>”;CertificateThumbprint=”6e132c546767bf16a8acf4fe0e713d5b2da43013″}
– Make sure your type the above command again in a administrator cmd without copy & paste
– run the Open Manage Server Administrator Web Console installer
2. install the downloaded Open Manage 7.1 VIB on esxi 5.0
– esxcli software vib install –deport=<your vib>
–


Leave a Reply